Before you start building a data load, please study the target form carefully and identify how many fields there are, how you navigate between fields, and most importantly the field navigation order. Also find out the keystrokes used to save the data.
For example, suppose we have a form like this:
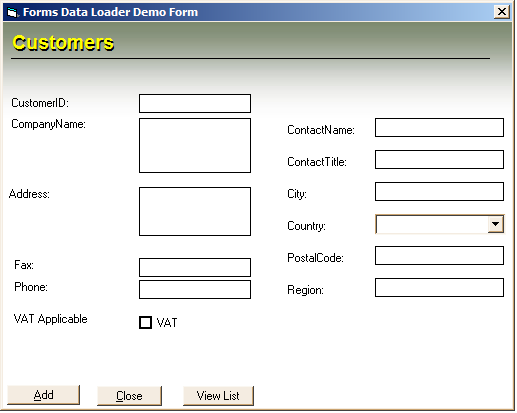
By closely studying the form, we've learned that to add a new record we have to press "Alt-A." When we press the Alt-A key, the buttons change like this:

Then we have to press {TAB} twice to reach the first field. To move between fields we use the {TAB} key, and finally to save the record we press "ALT-S," then again "ALT-A" to enter a new record, and so on.
In Forms Data Loader you can send a keystroke by entering it preceded by a backslash "\" — for example, "\{TAB}" sends a TAB keystroke to the target application. For a full list of keystrokes, please read the help file that comes with Forms Data Loader.
You can send data to the target application by simply typing the data as-is in the cell. Forms Data Loader uses a copy-and-paste mechanism to send the data.
To build the load for the form above, we build the spreadsheet like this:

Continued…

Continued…

Notice the last column: we're telling Data Loader to wait 50 milliseconds before starting to enter a new record. The delay field is very useful when the target application takes time to process data before it can accept the next keystrokes. You can adjust the delay time by editing the delay column.
Once you develop a load, you can populate the load sheet by copying and pasting data from Excel or any other spreadsheet. Forms Data Loader comes with a unique Paste Skipping Key Columns and Auto Fill feature which makes populating data from Excel very easy.
After you have prepared and populated the spreadsheet, press the "Start Loading"  button on the toolbar. You'll then see a window like this:
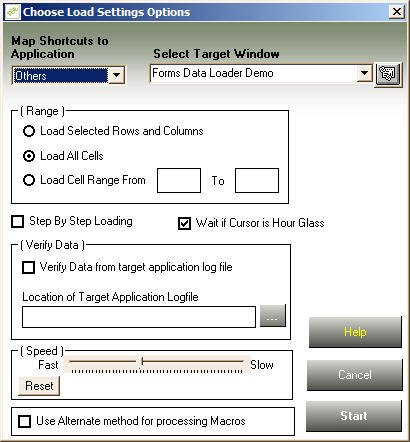
Here you can specify the following loading options:
- If you're using shortcuts, select the Target Application Type — FDL will map the shortcuts to the keystrokes you define in the Shortcuts form.
- Select the Target Window Title. If it's not showing in the drop-down list, press "Refresh" to refresh the list, or type the title of the target window directly.
- Select the range of cells you want to load.
- For an interactive load — waiting after processing each cell — select the "Step By Step Loading" checkbox. This is a good way to debug a load.
- Select "Wait for Cursor Hourglass" if you want FDL to wait until the mouse cursor becomes an hourglass before processing the next cell. Recommended, since the target application typically shows an hourglass while doing background processing.
- Use the Speed Slider to adjust how fast data is sent to the target application. Start slow and increase speed in subsequent loads.
- Check "Use Alternate Method for Processing Macros" if you find Data Loader isn't sending keystrokes properly. Some target applications don't support the default macro method, so Data Loader supports a separate processing method you can enable here.
After selecting the desired options, click "Start" to begin loading. You'll see a small progress indicator in the top-right of your screen.
For more information about keystrokes you can use in Data Loader, please click here.